Thursday, 4 February 2016

What is CORS?and more into CORS...


When does CORS Problem happens?
Problem happens for CORS only when the client is a browser.

How Client ensures it is safe to send the request of specific method,header,authorization etc,. ?
It will first send HTTP verb as Options and know what are all the allowed methods,headers etc,.This is called Preflighted request.

Server sending CORS headers:
This is second part.The server sends the CORS headers  in the response to the client asking the browser to relax for the methods,headers etc, coming in the response.As long as the browser supports CORS, these headers signal to the browser that it's okay to "relax" its same-origin policy, allowing the cross-origin API call to succeed.

Preflighted requests
Unlike simple requests (discussed above), "preflighted" requests first send an HTTP request by theOPTIONS method to the resource on the other domain, in order to determine whether the actual request is safe to send.  Cross-site requests are preflighted like this since they may have implications to user data.  In particular, a request is preflighted if:
·        It uses methods other than GET, HEAD or POST.  Also, if POST is used to send request data with a Content-Type other than application/x-www-form-urlencoded, multipart/form-data, ortext/plain, e.g. if the POST request sends an XML payload to the server using application/xmlor text/xml, then the request is preflighted.
·        It sets custom headers in the request (e.g. the request uses a header such as X-PINGOTHER)


http://docs.apigee.com/api-services/content/adding-cors-support-api-proxy 


Taking Digital Turn...

I am into API Management Technologies now..So,exploring into the concepts of it.
I will be sharing the knowledge I gained through learning the API Management concepts and tools.
Please feel free to contact me or add more information to the posts if you have more information about the topics I post and also share your feedback.

Sunday, 17 May 2015

MQ as a Service in IIB

IBM introdued MQ or Database as SOA service in IIB.This is available in earlier versions of WMB as supportpac.
This includes two things :
·         An IRI Specification defining addresses for referencing WebSphere MQ queues and topics in a way similar to URL Web addresses.
·         A WSDL Binding Specification defining extensions for WSDL that describe WebSphere MQ applications, including its connections, the queues or topics it uses, its message exchange pattern (request-response or one-way) and the quality of service and message formats it uses.
Why MQ or Database services can be used as SOA services?Whats the benefit?
·         Architects can catalogue MQ/DB  applications in a standard way as they are specified in WSDL
·         MQ/DB applications can be extended to Webservice stack. These specifications will enable them to write a WMQ/DB service implementation that will interoperate with other WMQ/DB service implementations.
·         Use the Service Definitions to aid the development, management and monitoring of WebSphere MQ/DB applications, particularly where tools exist that take advantage of these specifications
·         Helps in dynamic invocation

Now,lets create a MQ service and use it in a message flow,

1)Select MQ Service in File->New


2)After creating MQ service,a screen open for MQ service to fill in all the details
3)Provide MQ details to test the connectivity with MQ QueueManager

4)Next step is to choose,whether we are going for One-way or Req-Res modal ,and what are the queues we are selecting
5)Next is to choose ,MQ header information as below,
If we are selecting only one-way,then only Request MQ headers are sufficient to be fillied up
6) Now,we can choose the messagetypes for input messages by first having the messageset in the MQ service folder itself so that it gets referred in the Input (Use XML schema elements àOpen file)

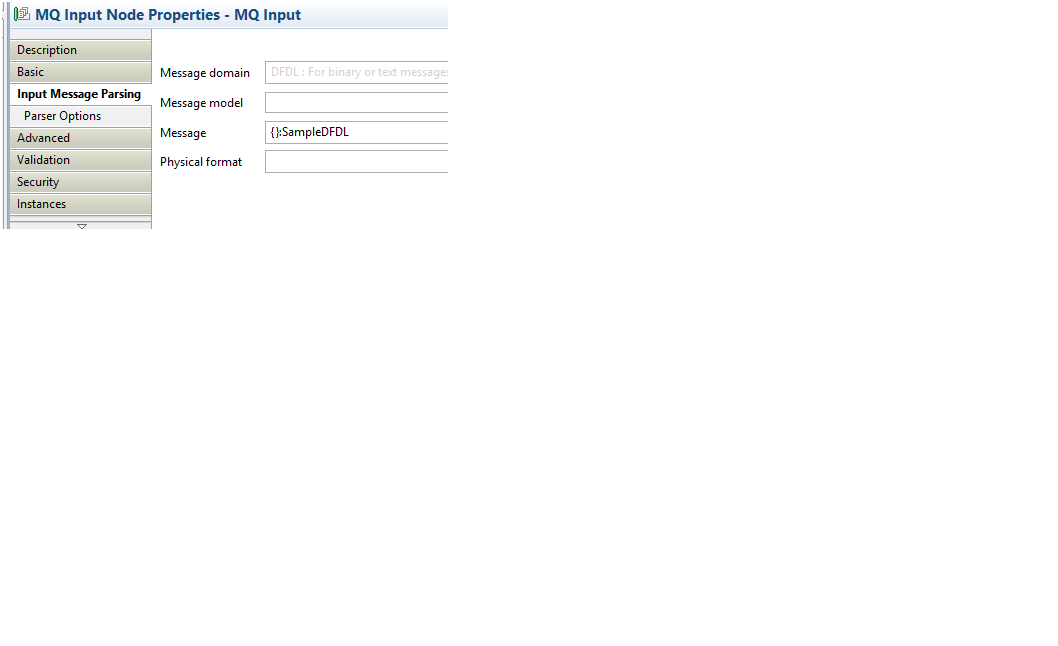
7)Now drag and drop the newly created MQService to the MQInput node.We can now see that all the properties defined in MQ Service gets reflected in the MQInput node’s properties.


Friday, 15 May 2015

A basic Android application development in IBM Worklight

How to install Worklight?
Steps:
1)Follow the steps in http://www.ibm.com/developerworks/mobile/worklight/download/studio.htmland get Juno Eclipse and Worklight plugin installed
Your IDE environment looks as below,


2)After installation when you try to open eclipse,if you are getting the below error
,


Your OS is 64-bit.You have installed eclipse juno as 64 bit.But your java jre is 32 bit.
Its evident by executing the below command,
If java installed is 64-bit,it would show the result of java –version as 64 bit.
Now after installing java-64 bit,

After successfully opening the IDE,now time to start with our Application development.
To view the application in IE,
On Preview console:
Now Previewing at Android mobile:


Mobile Browse Simulator

Simulator vs Emulator
A simulation is a system that behaves similar to something else, but is implemented in an entirely different way. It provides the basic behavior of a system but may not necessarily abide by all of the rules of the system being simulated. It is there to give you an idea about how something works.
Think of a flight simulator as an example. It looks and feels like you are flying an airplane, but you are completely disconnected from the reality of flying the plane, and you can bend or break those rules as you see fit. E.g.; Fly an Airbus A380 upside down between London and Sydney without breaking it.
An emulation is a system that behaves exactly like something else, and abides by all of the rules of the system being emulated. It is effectively a complete replication of another system, right down to being binary compatible with the emulated system's inputs and outputs, but operating in a different environment to the environment of the original emulated system. The rules are fixed, and cannot be changed or the system fails.
The M.A.M.E. system is built around this very premise. All those old arcade systems that have been long forgotten, that were implemented almost entirely in hardware, or in the firmware of their hardware systems can be emulated right down to the original bugs and crashes that would occur when you reached the highest possible score.

Running your application on a real device
When an Android device is connected to the computer with a USB cable, the Eclipse ADT plug-in automatically recognizes the Android device and attempts to deploy applications onto it.
Now installing ADT….
ADT Plugin
First install ADT bundle which also has SDK manager.So,the SDK location gets automatically populated

Android Development Tools (ADT) is a plugin for the Eclipse IDE that is designed to give you a powerful, integrated environment in which to build Android applications
ADT extends the capabilities of Eclipse to let you quickly set up new Android projects, create an application UI, add packages based on the Android Framework API, debug your applications using the Android SDK tools, and even export signed (or unsigned) .apk files in order to distribute your application.

Install Google USB driver by following the REF: http://developer.android.com/sdk/win-usb.html
Once the Android environment is set,below error may occur.Hence set the Project Build Target

Once all the errors are resolved in the native Android project,create .apk file if it is not created automatically.
Android application package file (APK) is the file format used to distribute and install application software and middleware onto Google's Android operating system.APK files are ZIP file formatted packages based on the JAR file format, with .apk file extensions
Create by choosing as below

Password used is “passwd”

Now send this .apk file saved in your PC to your Android mobile.While trying to open the .apk file in Android mobile,it will ask you with Android symbol to install.Say yes and that’s it …
All set!
You can see the application name with some icon in your modile and you can open to view the Application.

REF:

Using MessageBroker APIs

In this post,lets explore about Messagebroker APIs.
Dont get it confused with the term “CMP-ConfigManagerProxy”.Both the terms are one and the same.In initial versions of Message broker it was called as CMP.Later from WMB v7,it is called as MessageBroker API.
Whats the use of it?
If you want to control broker,its resources such as Egs,JVM,etc., and even if you want to develop message flows with just java code,you can make use of the MessageBroker APIs provisioned by WMB in your Application. You can also run CMP applications, and therefore control one or more broker components, from computers on which you have not installed IBM Integration Bus.
So,your application may be running in same server of broker –so connectivity between them will be Java Native Interface(JNI)
Your application may even be running in remote server- so connectivity between them will be SVRCONN(JNI)
Best picture which can explain this connectivity :

Now,lets jump into creating some samples using these APIs…
Lets first do some administrative tasks using these APIs.Some of the administrative tasks that we can do with APIs are Deploying,Navigating broker resources,setting User defined properties at runtime,working with Resource Manager statistics,Activity logs.
Add the ConfigManagerProxy.jar from the path  C:\Program Files\IBM\MQSI\9.0.0.1\classes to our java class build path  external jars
If we are getting error as below while connecting to QueueManager from Java program,then follow the steps as shown in Solution.
But “Radhamani” user is already having full permission while checking the Security in QM!
From MQ7.1,there is some default security
Beautiful explanation about this concept
The one on the bottom tells the QMgr "if someone tries to connect over a SVRCONN using an administrative user ID, block the connection in all cases."
To allow a connection from Broker Toolkit you have two choices as follows:
1.    Remove mqbrkrs from the mqm group. This allows it to connect without firing the CHLAUTH rule that blocks admin users. You will of course be required to grant authorization for the mqbrkrs group to all the broker and application queues to which it needs access since it is no longer an MQ admin.
2.    Override the CHLAUTH rule to allow the broker toolkit to connect as an admin on the SYSTEM.BROKER.CONFIG channel.
As a security specialist, I favor the first option. It is unavoidable that the MQ admin can administer the broker. However it is possible to avoid allowing the broker (and by extension all the broker flows) to administer the QMgr.
If, however, you wish to take the second route you'll need to override the CHLAUTH rule that blocks admin access. There are several ways to do this. You could delete the rule but that opens all your channels to admin connections. A more precise approach is to provide a rule just for the channel on which the administrator is to connect. For example:
SET CHLAUTH(SYSTEM.BKR.CONFIG) TYPE(BLOCKUSER) +
    USERLIST('*NOACCESS')
Since WMQ applies the most specific rule, the default rule is overridden by the new one but only for the SYSTEM.BKR.CONFIG channel. The BLOCKUSER rule syntax allows us to specify who to deny but not who to allow and it takes user IDs rather than group IDs. In order to allow admin access it is necessary to specify some ID that is not *MQADMIN. I picked *NOACCESS because it cannot be an actual user ID and is a reserved word used by WMQ elsewhere. You could as easily used any user ID such as nobody or even mqm. (Blocking mqm would allow mqbrkrs but not mqm however since mqbrkrs is in the mqm group it would not restrict mqbrkrs from administering the QMgr.)
Finally, note that any channel which allows admin access should be strongly authenticated. If the only CHLAUTH rule you set is the one above, then anybody with a network route to the QMgr can connect on that channel by asserting the mqbrkrs user ID on the connection. Once connected, they would have full control over the QMgr and the ability to remotely, anonymously execute commands using the mqm or mqbrkrs user IDs. At the very least add a CHLAUTH rule to filter conenctions on this channel by IP address. Or, even better, use SSL and filter connections by the certificate distinguished name.

I have disabled Channel Authentication to solve this error,
DISPLAY QMGR CHLAUTH
AMQ8408: Display Queue Manager details.
   QMNAME(RadQM)                           CHLAUTH(ENABLED)
ALTER QMGR CHLAUTH(DISABLED)
AMQ8005: WebSphere MQ queue manager changed.
REFRESH SECURITY
REFRESH SECURITY
AMQ8560: WebSphere MQ security cache refreshed.
DISPLAY QMGR CHLAUTH
 DISPLAY QMGR CHLAUTH
AMQ8408: Display Queue Manager details.
   QMNAME(RadQM)                           CHLAUTH(DISABLED)
End
Deployment using CMP
importcom.ibm.broker.config.proxy.*;
public class  CMP_Deploy {

  public static void main(String[] args) {
    BrokerConnectionParameters bcp =
       new MQBrokerConnectionParameters("localhost", 1414, "RadQM");
    try {
      BrokerProxy b = BrokerProxy.getInstance(bcp);
      ExecutionGroupProxy eg = b.getExecutionGroupByName("default");
      DeployResult dr = eg.deploy("F:\\Techie\\MyFirstApp.bar", true, 30000);
      System.out.println("Result = "+dr.getCompletionCode());
    } catch (Exception e) {
      e.printStackTrace();
    }
  }
}
This program deploys MyFirstApp.bar into the broker connected with RadQM Queuemanager in the EG “default”.
As we saw one Administration task using CMP,we shall now look into a development task using CMP(now called as Message Broker API).
Without even having MB toolkit,just by having JDE for develping code and compatible JRE,we can run the code in any computer.
Now ,lets create a simple message flow as below,
Java code to develop this simple flow using MessageBroker API is :
import java.io.File;

importcom.ibm.broker.config.appdev.FlowRendererMSGFLOW;
importcom.ibm.broker.config.appdev.MessageFlow;
importcom.ibm.broker.config.appdev.nodes.*;
public class CMPDev  {
    public static void main(String[] args) {

        try {
       
            MessageFlow mf1 =  new MessageFlow("CMPFirstDev.msgflow");
                       
            MQInputNode mqinNode = new MQInputNode();
            mqinNode.setNodeName("My Input Node");
            mqinNode.setQueueName("INPUTQ");
            mf1.addNode(mqinNode);
           
                       
            MQOutputNode mqoutNode = new MQOutputNode();
            mqoutNode.setNodeName("My Output Node");
            mqoutNode.setQueueName("OUTPUTQ");
            mf1.addNode(mqoutNode);
           
            mf1.connect(mqinNode.OUTPUT_TERMINAL_OUT,mqoutNode.INPUT_TERMINAL_IN );
            FlowRendererMSGFLOW.write(mf1,"F:\\Techie");
        } catch (Exception e) {
            // Add your own code here
            e.printStackTrace();
        }
    }

}